The short answer
Find the last numbered inch before your end point, then read the fraction past it. Between inches the marks run longest to shortest: 1/2, then 1/4 and 3/4, then eighths, then sixteenths. Count the sixteenths and reduce the fraction (8/16 = 1/2). On a metric blade, read the centimeter number and count the millimeter marks after it.
Most inch blades carry 16 marks to the inch, so one reading is three quick looks: the inch, the long mark nearest your point, and the short marks after it. This guide builds that up, then covers the parts that trip people up: the sliding hook, the case length for inside measurements, and the red and diamond marks. It belongs with the other pages in the measuring and layout section.
What you need
- A tape measure with an inch scale, a metric scale or both (some blades carry two scales).
- A pencil to mark the spot you read.
- The thing to measure, with a straight edge or two surfaces the blade can run between.
What every line on the blade means
Johnson Level & Tool, a maker of measuring tools, puts the rule in one sentence: “As the increments decrease, so does the length of the mark.” The numbered line is the inch. The half-inch is the longest line between two inches, and each smaller fraction gets a shorter line.
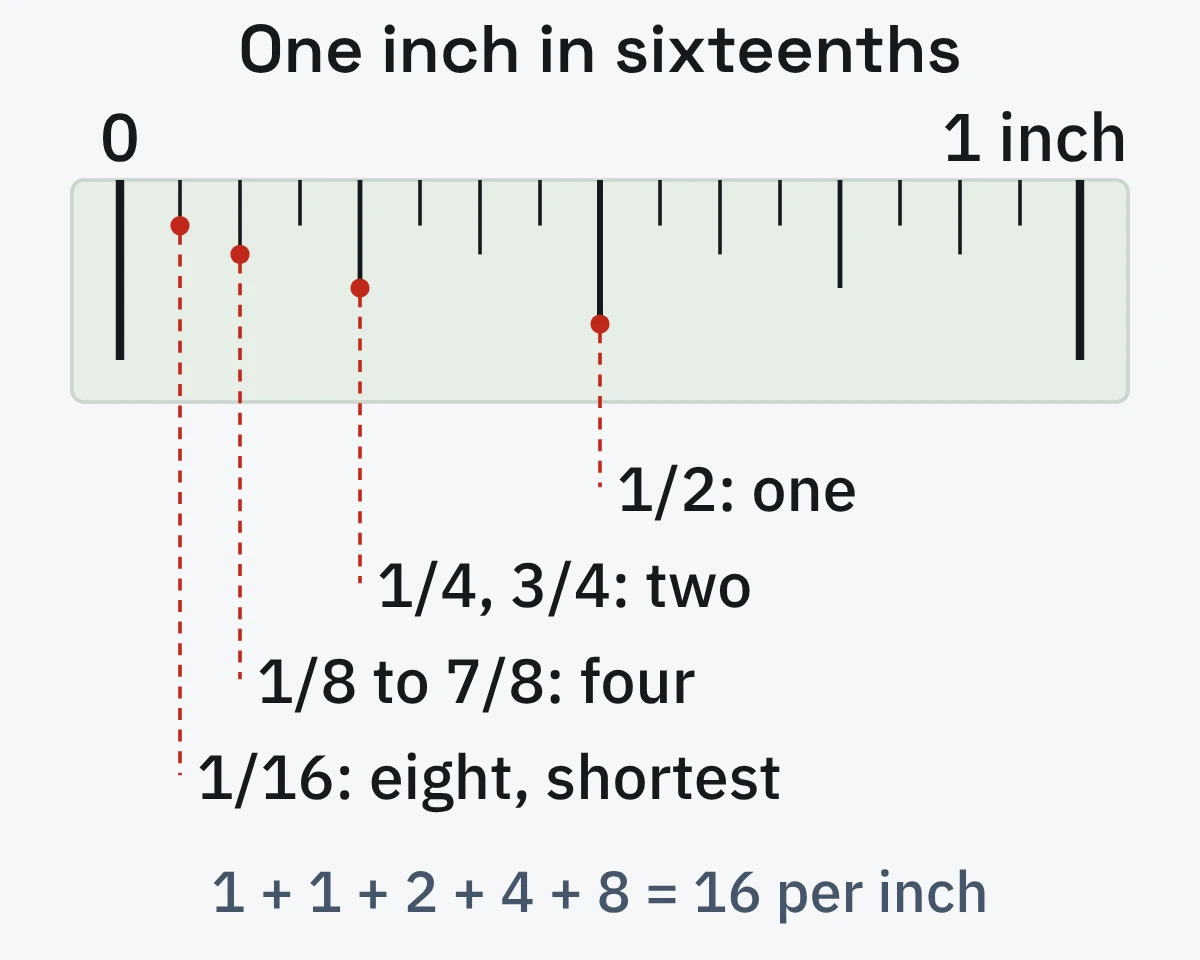
REEKON Tools, a maker of digital tape measures, counts the marks in each inch: one half, two quarters, four eighths and eight sixteenths, “16 marks per inch total.” The last column below is worked out here by putting every mark over 16.
| Mark | Fraction | Marks per inch | In sixteenths |
|---|---|---|---|
| Longest between inches | 1/2 | 1 | 8/16 |
| Next longest | 1/4, 3/4 | 2 | 4/16, 12/16 |
| Middle length | 1/8, 3/8, 5/8, 7/8 | 4 | 2/16, 6/16, 10/16, 14/16 |
| Shortest (most blades) | 1/16, 3/16 … 15/16 | 8 | the odd sixteenths |
Some blades go one step finer. Johnson Level shows a tape that “divides one more time”, down to 1/32, and REEKON says some tapes have “another set of lines in each gap” for 1/32. Each of the 16 gaps gets one more line, so a 1/32 blade has 32 marks to the inch (worked out here: 1 + 1 + 2 + 4 + 8 + 16). Home Depot’s guide, a retailer’s how-to, says blades are “generally 16 marks to the inch” and that some run to 32 or 64.
Tip
Read the line, not the printed number. Home Depot’s guide says: “Stay accurate by measuring the indicator lines themselves, not the numerals on the tape.”
How to measure and read it, step by step
Set the hook on the start
Hook the end over the edge of the object, or press it against the starting surface, and pull the blade out along the length. U.S. Tape, a maker of measuring tapes, says to “pull or push your tape so that it’s taut”.
Find the last whole inch
Look for the last numbered line your end point has passed. Write that number down.
Count the small marks past it
Count the shortest marks (sixteenths) from that inch line to your end point. Use landmarks to save time: the half mark is 8 sixteenths along, the quarter marks are 4 and 12.
Reduce the fraction
Divide top and bottom by 2 until the top number is odd. REEKON gives the common ones: 8/16 = 1/2, 4/16 = 1/4 and 12/16 = 3/4. Six sixteenths reduce to 3/8 (worked out here).
Add the inches and the fraction
REEKON’s example: a mark three short lines past 4 inches reads 4 3/16 inches. Johnson Level adds a whole inch to a fraction the same way: “you’d add 1 inch + 1/4 inch to get 1¼ inch”.
Release the lock and let the blade go back slowly
Home Depot warns that “Allowing it to snap back can damage the tape and possibly give you a cut.”
Johnson Level’s practice readings show the method on three marks. The third one needs the 1/32 scale.
| What you see | Working | Reading |
|---|---|---|
| The 2″ line to the 1/8 mark after the 3″ line | 1″ + 1/8″ | 1 1/8″ |
| Halfway between 5/8 and 3/4 | 10/16 and 12/16, halfway is 11/16 | 11/16″ |
| One 1/32 mark short of the 1/2 mark | 16/32 − 1/32 | 15/32″ |
Tip
You can skip the counting. REEKON suggests reading from the nearest half or quarter: “a quarter past 4, minus a sixteenth” is 4 3/16″.
Feet and inches
Home Depot’s guide says many tapes print a foot mark every 12 inches, and some add a mark every 3 feet. To turn an inch reading into feet and inches, divide by 12 and keep the remainder. For example, 55 3/16″ is 4 ft 7 3/16″ (worked out here: 4 × 12 = 48, and 55 − 48 = 7). Going the other way, 4 ft 7 3/16″ is 48 + 7 = 55 3/16″.
Reading the metric side
A metric blade is simpler because nothing needs reducing. Home Depot’s guide says: “Metric tape measures feature 10 marks to the centimeter.” The bold, numbered lines are centimeters, and the longer line in the middle is the half-centimeter. REEKON gives the method: “Read the centimeter number, then count the small millimeter lines past it (10 mm per cm).”
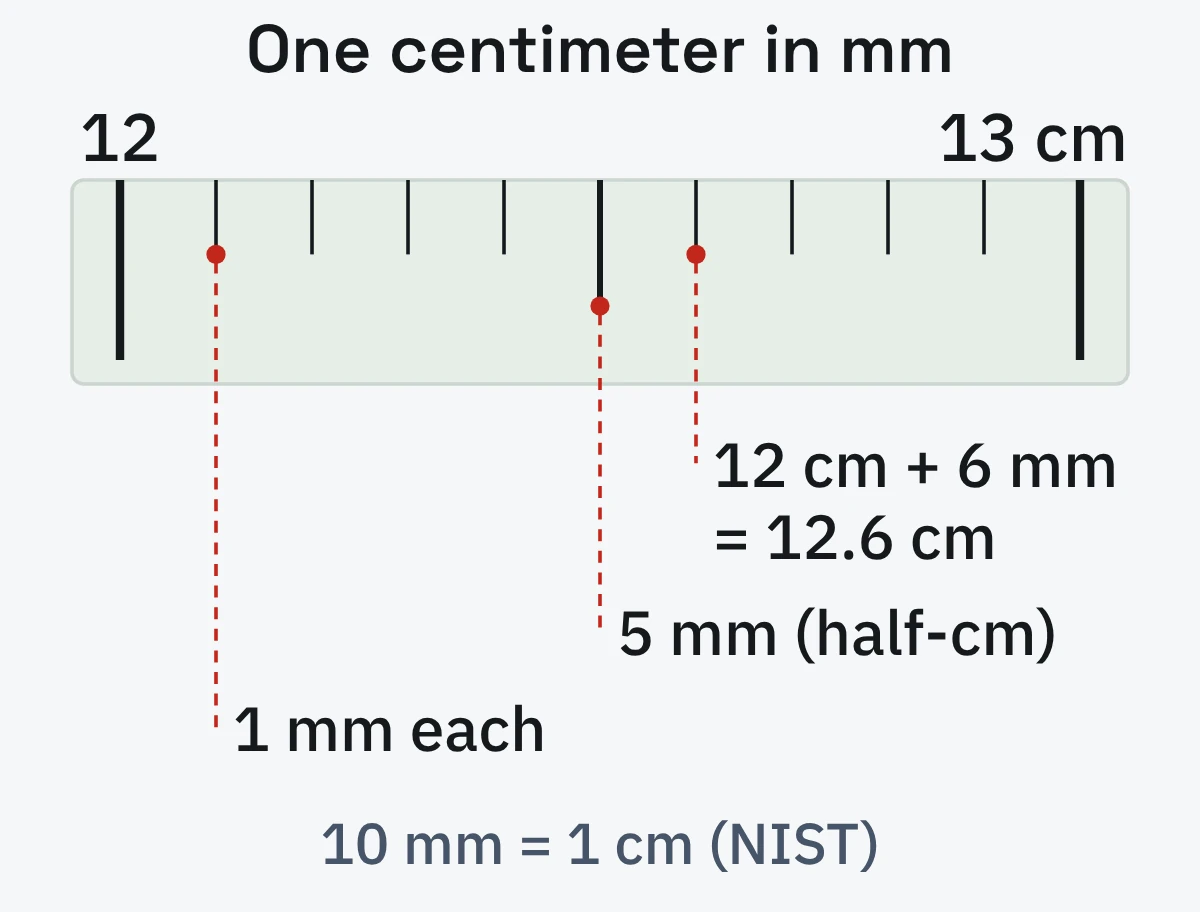
NIST, the US standards agency, lists the units: 10 millimeters (mm) = 1 centimeter (cm). Home Depot’s example reads the same way: 20 whole centimeters and 6 millimeter marks is 20.6 centimeters.
The two systems link through the inch. NIST quotes the 1959 notice that fixed it: the inch “is exactly equivalent to 25.4 mm.” That makes one sixteenth of an inch 1.5875 mm (worked out here: 25.4 ÷ 16), a little wider than a millimeter mark.
On a dual-scale blade, check which row you are reading. Architectural Digest says tapes with both scales commonly print metric in red and inches in black, “at least in the US”. REEKON says split blades “show inches and mm together.” Other makers may differ, so look for the unit label on yours.
Red numbers, stud marks and black diamonds
Two printed marks are not fractions at all. They flag layout spacings, and the makers explain them like this:
- Red numbers or boxes every 16 inches. Komelon, a tape-measure maker, says 16-inch stud centers are common under general building practices and that “Red markings make layout easier.”
- Black diamonds every 19.2 inches. Stanley says its black diamond marks every 19.2 inches on its blades, for “spacing of engineered joists common on job sites.” Komelon says span tables for engineered lumber “multiply to 96 inches”, the length of a sub-floor panel. Five diamonds fit in 96 inches (worked out here: 5 × 19.2 = 96).
Makers do not write the spacing the same way. Stanley, Komelon and REEKON give 19.2 inches; U.S. Tape and Home Depot’s guide give 19 3/16 inches. The two differ by 0.0125 inch (worked out here: 19.2 − 19.1875), less than 1/64 inch (0.0156), but only the decimal form makes five bays equal 96 inches (worked out here: 5 × 19 3/16 = 95 15/16 inches).
These marks only show where a spacing falls. What the spacing should be for a floor or wall comes from the plans and local building rules, not from the tape.
Why the hook slides
The loose hook is not a defect. Stanley says its “Tru-Zero” hook means you do not have to compensate for hook thickness, and that it “allows accurate inside and outside measurements.” Komelon says: “The end tip slides to adjust for the width of the blade tip to ensure accurate inside/outside measurements.”
How far it slides is the hook’s own thickness. U.S. Tape says the metal tip is “exactly 1/16 of an inch thick”; REEKON says the hook is designed to move “exactly the thickness of the tape hook metal (usually around 1/16″).” REEKON’s “usually” leaves room for other thicknesses, so do not assume yours is exactly 1/16 inch.
- Outside measurement (hooked over an edge): the pull slides the hook away from the case. REEKON says the tape then “starts at zero” measuring from the inside face of the hook, so the metal is not counted.
- Inside measurement (hook pushed against a surface): the hook slides toward the case, and the reading starts from the outside face of the hook, so the metal is counted. Home Depot’s guide uses the same two terms for the same two movements.
A hook that is bent or worn works against you. REEKON lists “Bent hooks, worn blades, and drifted printing” as sources of error in every reading.
Tip
Home Depot’s guide describes a way to avoid the hook: “burn an inch.” Start at the 1-inch line instead of the hook, then subtract 1 inch from the reading.
Measuring inside a space with the case
When the blade cannot be hooked on both sides, press the case against one surface and add the case length. Bauer Maßstabfabrik (BAUMA), a German maker of measuring tapes, explains: “you press the case against the wall, so the tape cannot reach its true zero point. High-quality tapes indicate the exact case length (e.g., 7.0 cm).” Its example: “Tape shows 81.3 cm, case length is 7.0 cm → inside dimension = 88.3 cm.”
U.S. Tape says “Most tape measure cases have their length stamped or printed right on the side or bottom,” and that this saves bending the blade, which “can kink or damage your tape blade.” Home Depot’s guide, using a 3 3/8-inch case, adds 15 inches on the blade to get 18 3/8 inches.
Use the number printed on your own tape.
Standout and reach: the claim on the box
Standout is not something you read off the blade. ToolGuyd, a tool-news publication, defines it as “the maximum extension of a blade before it collapses under its own weight.” It matters when you measure alone across a gap with no support.
Makers word it differently. Milwaukee’s 25-foot wide blade tape lists “18’ of Reach and 15’ of Standout” as two numbers. Stanley’s 25-foot FATMAX Classic lists “14-ft Of reach” and carries a footnote on the page reading “Based on maximum extension of average professional user.” ToolGuyd reported in 2019 that Stanley, Dewalt and Craftsman had started to advertise “reach” where Milwaukee still used “standout.” Compare these numbers only within one maker’s wording.
Blade width plays a part in stiffness. The designers Architectural Digest interviewed “preferred one-inch or wider blades, since the extra stiffness makes the tape less likely to flop around when you extend it to longer lengths.”
Mistakes that throw a reading off
- Reading the number, not the line. The numeral sits beside its line; measure to the line.
- Counting from the wrong inch. Start from the last numbered inch your end point has passed, not the next one.
- Reading the wrong row. On a two-scale blade, check the unit before you write the number down.
- Letting the blade sag or bend. U.S. Tape’s advice is to keep it taut, and designer Heather LaBoda tells Architectural Digest: “It’s easy to bend a tape measure, which can cause inaccuracies.”
- Forgetting the case on inside measurements. The reading is short by the case length unless you add it.
More step-by-step pages sit in our tool-skills guides.
No tape measure on hand?
A printed ruler or yardstick is read the same way. For a rough size check, the US Currency Education Program says Federal Reserve notes have measured 6.14 x 2.61 inches since 1929, which is about 156 mm (worked out here: 6.14 × 25.4 = 155.96). A bill is for estimating only. For anything you will cut, drill or buy to fit, take a real measurement. Other Know-How pages cover everyday skills.
Frequently Asked Questions
Q. What is each line on a tape measure?
The numbered line is a whole inch. The longest line between inches is 1/2, then 1/4 and 3/4, then the eighths, then the shortest marks, the sixteenths. The table above lists each one.
Q. How do I read the smallest lines?
They are usually sixteenths. Count them from the last whole inch and reduce the fraction. Three lines past 4 inches is 4 3/16 inches, as REEKON’s example shows.
Q. How do I read millimeters on a tape measure?
Read the whole-centimeter number, then count the millimeter marks past it. Twelve centimeters and 6 marks is 12.6 cm, or 126 mm.
Q. What are the black diamonds on a tape measure?
Stanley says they mark every 19.2 inches, for the spacing of engineered joists. They are layout marks, not fractions, so skip them when you read a length.
Q. Why does the end of my tape measure move?
It slides by about the thickness of the hook, so the zero point is right for both inside and outside measurements. Stanley and Komelon both describe it as intended.
Q. How do I measure something without a tape measure?
Use a ruler or yardstick, or a known size such as a US dollar bill (6.14 inches long) for a rough figure. Take a real measurement for anything that has to fit.
Sources (15)
- Johnson Level & Tool, How to Read a Tape Measure
- REEKON Tools, How to Read a Tape Measure (blog)
- REEKON Tools, How To Read A Tape Measure (guide page)
- Stanley Tools support, Why does the hook on my tape measure move?
- Stanley Tools support, What does the black diamond mean on the measuring tapes?
- Stanley Tools, 25-ft Classic Tape Measure 33-725
- Komelon USA, Frequently Asked Questions
- U.S. Tape, Hidden Features of a Tape Measure
- Bauer Maßstabfabrik (BAUMA), Retractable and measuring tapes guide
- Milwaukee Tool, 25ft Wide Blade Tape Measure 48-22-1225
- The Home Depot (retailer), How to Read a Tape Measure
- NIST, SI Units: Length
- ToolGuyd, Why Dewalt, Craftsman, Stanley Now Describe Tape Measure Extension with “Reach”
- Architectural Digest, How to Read a Tape Measure
- U.S. Currency Education Program, $1 Note